


The purpose of this guide is to walk you through understanding how to select friendly, enemy, and ground targets on a traditional mouse+keyboard setup in FFXIV. It will also introduce you to the many customizable options you can leverage to better suit your playstyle and allow you to target, select, and switch seamlessly based on your personal preference. This topic might be of particular interest to healers who frequently swap between enemies and allies, but is useful for tanks and DPS players as well.
Basics of Targeting
Players often have to switch their current target in combat in FFXIV. This can be to select and attack an enemy or to select and assist an ally. Selecting and swapping targets can be one of the harder gameplay skills to master. However, becoming proficient will improve your performance and enjoyment of the game.
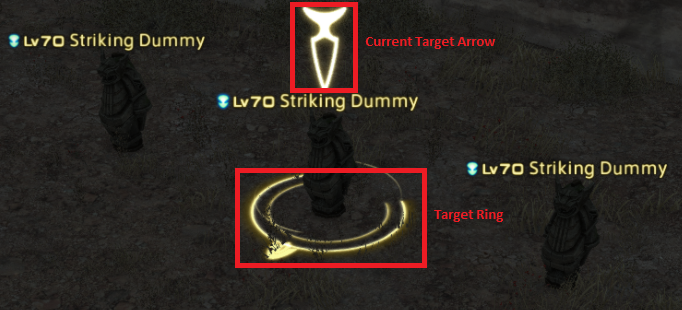
The picture below shows what a current target looks like. The big vertical downward Current Target Arrow helps you to locate where it is. The Target Ring shows its orientation. The small arrow shows where it’s facing. The empty space behind is its rear, while the sides are its flanks. This is of particular interest to melee combos of some DPS jobs. Note that Both enemy and ally targets show the same indicators and only differ in color.
Enemy Targeting
Cycling Through Enemies
“Cycle through Enemies” options are under System [ESC] -> Keybind -> Targeting. There are both “Nearest to Farthest” and “Farthest to Nearest” options, but only the first one is needed in practice (however, having both adds some flexibility at the cost needing more keybinds). Executing the keybind will target the nearest (the exact definition of “nearest” depends on the setting and will be talked about later) enemy in proximity to your character. And each subsequent execution will target another valid enemy (“valid” also depends on the setting) until it has cycled through all and returns to the original target. The default keybind is [Tab], but you can change it to whatever you feel comfortable with. Cycling through enemies is one of the most common practices of targeting widely used in other MMORPGs as well, hence the industry term: “Tab Targeting MMO”.

As an alternative, cycling through enemies can also be achieved by scrolling the mouse scroll wheel. System [ESC] -> Character Configuration -> Control Settings -> Mouse allows you to bind various combinations of mouse scroll wheel inputs to the same aforementioned cycle through enemies commands.

Ignore Depth vs. Cone for Targeting Closest Enemies
There are two paradigms for cycling through closest enemies, Ignore Depth and Cone, which can be found under System [ESC] -> Character Configuration -> Control Settings -> Target. Both might not work exactly as you’d expect them to do. I’ll try my best to explain their behaviors. You can then experiment and choose whatever makes more sense to you.
Ignore Depth
Ignore Depth will select the first target strictly closest to your character, as long as it can be seen by your camera view. But once an initial target has been selected, all subsequent executions will select targets based on a strictly left to right basis, starting from your initial target. It will only target enemies visible on your screen.
Cone
Cone will at first target the closest enemy that’s in front of where your camera is facing(NOT where your character is facing). Imagine the targeting system as a triangular “cone” shape that radiates from the direction of your camera. Once an initial target has been acquired, subsequent executions will try their best to follow this radiating cone pattern, but can still feel unpredictable at times. It will only target visible enemies in this cone and will not target behind it.

In my opinion, Ignore Depth is more predictable but less intuitive since it’s more likely to target enemies far away from your character just because it’s the next one on the strictly left-to-right basis of your camera. Cone is more intuitive since it emulates what one would imagine as “nearest to farthest” slightly better, but at the cost of being more mysterious in how it targets within the cone. In either case try to adjust the camera view in order to more easily target what you want, according to their behaviors.
Other Keybind Options for Targeting Enemies
There are many more enemy targeting options you can keybind under System [ESC] -> Keybind > Targeting. I have highlighted five that players are more likely to find uses for. Choose to use however many of those you think make sense for you. But keep in mind that the more you use, the more keybinds you’ll need.

Target the Target of Your Current Target (Assist Target)
Targets whoever your current target is targeting. For example, as a healer you may target a tank to heal them, and then execute your keybind for Assist Target. This will automatically select your tank’s target, which is most likely to be an enemy or the main boss of your encounter.
Target Last Target
Targets the last target you previously selected. This includes both allies and enemies. If two targets have been chosen in succession. Repeatedly executing it will bounce between the two targets.
Target Last Enemy
Targets the last enemy you previously selected. Can only go back to the latest enemy.
Target Nearest Enemy
Targets the closest enemy to your character(same as the first execution of Cycle Through Enemies using Ignore Depth).
Target Current Focus Target
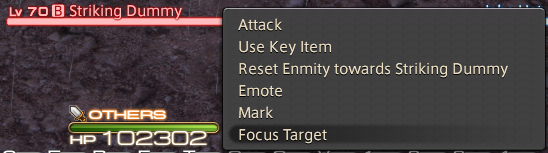
Targets the Current Focus Target (usually the boss, or the main tank). You can set a focus target by right clicking their name in the target bar and selecting “Focus Target” from the submenu or use a keybind that selects your current target as your focus target.
Clicking On Enemies
In Game Model
An often overlooked method of selecting enemies is simply by clicking the enemies’ physical in-game models with your mouse cursor. Left click to select as a target. Right click to select as a target and begin auto attacking it.
Enmity List
Left clicking on an enemy in the enemy list will also select that target. A side note is that the letters next to the names of the enemies can be used to communicate what enemies to focus your team’s attacks on.

Ally Targeting
Self-targeting Special Case
It’s worth noting that self-targeting is a special case. When you have either no target selected, or an enemy target selected, single target beneficial skills that work on friendly targets will default to yourself as the target. For example when you have the boss targeted and then cast a heal without changing target, that heal will automatically go on yourself. This is a convenient feature that you can use to your advantage.
Clicking on Allies
Party List/Alliance List
Clicking on individuals in the party and alliance list UI will select them as your target. This is a very common and the default way to select allies. Perfecting this method is considered an optimal option. While it can be hard to master, it can definitely be worth it in the long run.

In Game Model
Similarly to enemies, left or right clicking allies’ physical in-game models will select them as the target. This could be used when there are alot of valid targets, or your target is not in your party/alliance. However this method might be prone to misclicking if people are stacked on top of each other.
Soft Targeting
This is a common targeting practice for controller players. However it can also be used with a mouse+keyboard setup. Essentially, soft targeting will select an ally as the “soft” target (indicated by the dotted circle around the model and the light yellow highlight in the party/enemy list) for your next single action only. After that action is executed, you will snap back to the “hard” target (indicated by the downward arrow on the model and the more prominent hard outline around the party/enemy list) that you had selected previously.
You can see it in action in the clip below. The dotted circle around my party member and the light yellow highlight around their name in the party list UI indicates they have been soft targeted. After I use exactly one action on them (e.g., a heal), the target snaps back to my previous hard target, in this case the striking dummy, without the need for any additional inputs. There are two ways to set up soft targeting, which are discussed below.
Emulating a Controller
The first way to set up soft targeting on a mouse+keyboard setup is to emulate a controller. D-pad Up and D-Pad down represent scrolling up and down the party list using soft targeting only, which you can of course bind to any keys you like.

Mouse Wheel Settings For Soft Targeting
The second way to soft target is to use the mouse wheel settings we have seen before, in System [ESC] -> Character Configuration -> Control Settings -> Mouse. This method could be faster, but harder to be precise with.

Locking in a Soft Target as the Hard Target
One drawback of solely using soft targeting is that you can only use exactly one action on an ally before your selection snaps back. This can create a problem when you want to quickly double weave two oGCD heals on the same target, for example. To instead hard target a currently selected soft target, you can use the “Confirm” keybind found in System [ESC] -> Keybind -> System.

Keybind Options for Targeting Allies
You can also assign keybinds for selecting party and even alliance members. The default is [F1] – [F8]. However you can consider changing these to easier to reach keybinds if you decide you want to use this method and the default is uncomfortable(F5 and beyond are particularly hard to reach). Be aware that this requires a lot of different keybinds that you may or may not be able to squeeze out in addition to your combat job keybinds.

Ally Targeting Macros
Be aware that macros are never optimal because they don’t queue. Never macro GCDs. The effect of losing cast time from using GCD macros can be seen here. oGCD(off GCD) macros are less punishing and won’t always result in suboptimal play, but will still put you at a higher risk of clipping or simply the macro not going off, especially when trying to double weave macros. However, some people might find oGCD macros easier to use and the tradeoffs acceptable.
Macros can also be used to assist with ally target selection. You can create them from System [ESC] -> User Macros. Macros can often be easier to execute, which is the main reason most people use them. We can use repeated lines in macros to slightly aid in the responsiveness of execution by only partially emulating queuing. However it is not a substitute for an unmacroed action. With that disclaimer out of the way. If you still want to use macros, we’ll talk about some common macros that assist with targeting below.
Mouseover Macros
Yet another option for selecting allies is with mouseover macros for some oGCD skills, such as healers’ oGCD heals. Mouseover macros allow you to use skills on party members by hovering your mouse over them in the paty list, without hard selecting them.
Here is an GIF example of mouseover macros in action. Notice that I only hover the mouse cursor over my party members to heal them by executing the mouse over macro, without actually clicking on them. And afterwards I can keep attacking my main target, without ever deselecting it.

An example of setting up a mouseover macro by going to System [ESC] -> User Macros is shown here. It executes the AST heal

Target Specifying Macros
In addition to the unique function of hovering the mouse cursor, there are also other, more traditional ways to specify the target of a oGCD skill within macros. Such functions include (target of target), (focus target) and (position on the party list). Below are some examples.
This macro will cast a WHM shield

This macro will cast the tank role action

Ground Targeting
Clicking the Ground
The default and the most optimal way to select the location of ground based AOE skills is to simply click on the desired location with the targeting reticle. A good tip is that you can pre-position your mouse cursor in anticipation, even before you use the skill and before the reticle appears.
Executing ground clicking fast enough to not cause clipping can prove to be somewhat difficult. But it’s entirely possible to become extremely good/perfect at it with some practice. And it’s encouraged that you try to do so first.
Ground Targeting Macros
There are also macro alternatives should you choose. But as always keep in mind the drawbacks of macros mentioned above. It’s also best to have both macroed and regular versions of ground AOEs, so that when you want to place them at very specific locations, you still have that flexibility. The most commonly used functions are (target) and (self) for this purpose. But others like (focus target), (pet) and (mouseover) also work. Here are some examples.
The following macro will place the healing zone SCH

The following macro will place the damage zone DRK

What Targeting Methods to Choose
Now you’ve seen various methods of both enemy and ally target selection, you might be wondering — which ones should I choose?
It depends. There is no “right” or “wrong” choice per se; it all depends on what you find most comfortable. Keep in mind that you’re not limited to just one or two targeting methods. You can mix and match to suit your needs or for different situations.
For example, I personally use “Cycle Through Enemies” (default [Tab] key) with “Ignore Depth”. But in dungeons where there are alot of mobs and I want to select the highest health one near the center to base my AOE attacks off of, I sometimes click directly on a monster’s in-game model. For targeting allies in 4-man dungeons and 8-man raids, I only click on the party list to switch hard targets. Then I quickly [Tab] back to the enemy to keep attacking. However, in 24-man raids and the 72-man PvP encounter Frontline, I also click on players’ in-game models in order to heal or attack them. For ground AOEs, I only use manual placing with the cursor.
You’ll likely find something else that works suits you better. Maybe you like how soft targeting with a confirm button works. Maybe you’re willing to take the risk of macros and use mouseover macros. Maybe after using a heal on an ally you want to use keybinds for “Target Current Focus Target” or “Target The Target of Your Current Target (Assist Target)” to go back to the boss. Maybe you find using a macro to place ground AOEs around yourself to be adequate and comfortable. As long as the targeting scheme makes sense to you, it’s fine.
Conclusion
Hopefully after reading this guide, you’ll have a better idea about how you want to go about target selection and target switching. Again, there is no right or wrong answer and only you know what’s best for you. Experiment with the different methods to feel out the pros and cons of each, and settle on a combination that works for you!
GLHF fellow adventurers!