Search
Close this search box.

The Phoinix Encounter Guide (P3S)

Draft guide for the first floor Pandæmonium Savage
SaltedXIV et al.
Table of Contents

Introduction

Welcome to the SaltedXIV encounter guide for the third floor of the savage tier, Asphodelos: The Third Circle (Savage). This raid requires an average item level of 580 to enter. Players will face off against the Phoinix raid boss in a fiery arena with a myriad of mechanics and challenges ahead.

Timeline

Phase 1
0:09Scorched Exaltation
0:16Heat of Condemnation
0:29Experimental Fireplume
0:39Left/Right Cinderwing
0:52Darkened Fire
1:03Brightened Fire
1:30Heat of Condemnation
1:39Scorched Exaltation
1:51Devouring Brand
1:57Experimental Fireplume
2:09Searing Breeze
2:15Left/Right Cinderwing
2:23Heat of Condemnation
2:32Experimental Fireplume
2:41Trail of Condemnation
Phase 2 - Adds
2:55Adds(Sunbirds x3)
3:20Revive Adds(Sunbirds x3)
3:30Fireglide Sweep
Phase 3 - Fountain of Fire
4:28Dead Rebirth
4:47Heat of Condemnation
5:02Fledgling Flight
5:26Experimental Gloryplume
5:56Fountain of Fire
6:05Sun’s Pinion
6:29Scorched Exaltation
6:37Scorched Exaltation
6:47Heat of Condemnation
Phase 4 - Firestorms
7:02Firestorms of Asphodelos
7:10Flames of Asphodelos
7:15Experimental Ashplume
7:28Flames of Asphodelos
7:41Storms of Asphodelos
7:52Darkblaze Twister
8:00Searing Breeze
8:06Experimental Ashplume
8:21Scorched Exaltation
8:33Death’s Toll
8:42Fledgling Flight
8:48Life’s Agonies
9:19Experimental Gloryplume
9:34Trail of Condemnation
9:53Devouring Brand
9:59Experimental Fireplume
10:11Searing Breeze
10:17Left/Right Cinderwing
10:28Scorched Exaltation
[….]
ENRAGE

Mechanics

  • Scorched Exaltation: Raidwide
  • Heat of Condemnation: Double tank tether buster. Tanks need to take tethers and be away from the party and each other.
  • Experimental Fireplume: Similar to Normal. Either a baited big out circle or shiva circles. If it’s shiva move into the second edge hit to be safe. If it is big circle, everyone stacks middle to bait it then move to safe area.
  • Left / Right Cinderwing: Cleaves relative to the boss (boss’ left, boss’ right)
  • Darkened Fire: Spawns Darkened Fire mobs on all t/h or all dps. Buddy system on intercardinal squares around the boss.
  • Devouring Brand: spawns fire in a cross shape through the arena, from the edges.
  • Searing Breeze: Spawns aoe puddles under all party members that need to be dodged. Stack up to make this easy.
  • Trail of Condemnation: Boss dashes through arena. This is accompanied by either a spread or a buddy stack. See below
  • Dead Rebirth: Raidwide. (Presumably this wipes the party if adds phase is not done correctly?)
  • Fledgling Flight: Spawns eyeball adds on top of a player. They will face the same direction the indicator faces, and do an aoe out that direction shortly after they have been dropped.
  • Experimental Gloryplume: Combines an Experimental Fireplume with a stack or a spread. The telegraph will be fire balls (same as Experimental Fireplume) followed by dark balls indicating the stack or spread.
  • Fountain of Fire: Mechanic vomit – see below
  • Firestorms of Asphodelos: Big Raidwide and spawns the fire pillars
  • Flames of Asphodelos: Pizza AOEs around the boss one after another.
  • Experimental Ashplume: Stack or spread marker – dark balls that are the same as in Gloryplume
  • Darkblaze Twister
  • Death’s Toll: Puts a debuff on everyone in the party. It will have 1, 2, or 4 stacks. See below for how to resolve.
  • Life’s Agonies: Heavy Raidwide and resolves the above mechanic.

Detailed Order and Explanations

Phase 1

Scorched Exaltation
Heat of Condemnation
Experimental Fireplume
Left / Right Cinderwing
Darkened Fire
Pair off DPS and support team members, and have one pair stand on each of the small intercardinal squares on the arena around the boss. This ensures the darkened fire mobs spawn the correct distance apart. If the mobs spawn too close together they will tether and cause a wipe.

Players will then receive a dark puddle, and a number from 1-8. Players need to spread out such that two darkened fire mobs are hit by their puddle, and around the boss as shown in the diagram below. Each player will be hit by two puddles so healing will be needed.

If the mobs don’t die from the hits or are missed, be sure to finish them off quickly.

Heat of Condemnation
Scorched Exaltation
Devouring Brand
Experimental Fireplume + Bait Puddle + Searing Breeze
The party must all move into one of the safe quadrants If it’s Shiva you need to react and move into a quadrant that takes the first hit.

Party should stack up tightly near the edge of the arena to bait the Searing Breeze puddles. Move into the middle of the arena (as much as you can – don’t step in the fire cross) to dodge.

Left / Right Cinderwing
Resolves after the fire leaves the arena, so don’t worry if the safe spot is initially in fire.

Heat of Condemnation
Experimental Fireplume
Trail of Condemnation
Phoinix will dash across the arena, and telegraph either buddies or spread.

SPREAD

BUDDY STACK


Spread (single red light): players should not get hit by the dash, and spread out along both sides of it. Players can move to the same spot every time.

Buddy stack (two red lights):  Use the same buddy pairs from earlier, and spread out the pairs in a line along the length of the dash. Buddy pairs can move to the same spot every time.


Phase 2 – Adds

Raidwide (Flames of Undeath)
Sunbirds should be pulled apart, and to the edge of the arena in each cardinal.

The adds cleave so be careful.

They will revive bigger, and create multi segmented tethers (The add will jump to a person, and then to the next person in the line). Tanks pick up two adds each.

Resolve as follows, ensuring that after a bird dashes to you (if you have two tethers) you take a step back as their second dash is lethal. 

Double tethers run opposite the bird you are tethered to – single tethers opposite the person you’re tethered to. This should end up with a single and double tether near each bird.

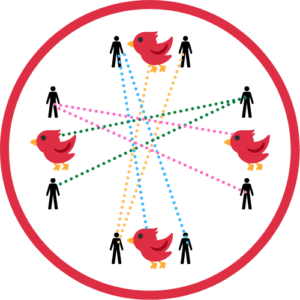
These tethers will also hurt anyone else they charge through, so players should bait them around the edge and avoid hitting others.

After tethers, adds should be killed one at a time, spread out in cardinal positions. They enrage if not killed in time.

Raidwide (Flames of Undeath)

Phase 3 – Fountain of Fire

Dead Rebirth
The Off Tank will start receiving autos from the boss at this point (whenever the boss has the little eyeball adds floating around him)

Heat of Condemnation
Fledgling Flight

For this first Fledgling Flight, players should drop their eyeball on the edge of the boss’ hitbox, and have it facing the wall. This ensures the center is safe from all the eyeball cleaves.

Experimental Gloryplume
If the combination contains Shiva, split the party so that melee go into one safe spot with the boss, while ranged take the opposite. Stacks can be resolved with light parties.

Have a designated stack spot if it is out and stack.

Fountain of Fire
Closest two players to the boss bait three pairs of pink AOEs.

  • Ranged first (N/S)
  • Tanks second (E/W)
  • Melee third (N/S)

As soon as you get your puddle, move out of the middle so the next pair can bait. Puddle pairs should drop their puddles outside the boss’ hitbox ring, directly across from each other. First and third pairs should be N/S. Second pair E/W. Leave enough space in the middle for the next pair to bait, but be close enough for melee uptime. Third pair will need to start at about a 45 degree angle and move into the cardinal once the first pair’s mechanic is fully resolved.

When your puddle drops, it will spawn a purple add with a proximity tether. Move through the boss and just past the opposite person’s add until the tether is happy. If done correctly, melee should be able to maintain uptime. 

While this is all happening, healers take the fountains around the outside of the arena and get a massive healing buff.

Scorched Exaltation x2
Heat of Condemnation

Phase 4 – Firestorms of Asphodelos

Flames of Asphodelos
Three fire pillars spawn around the outside of the arena.

Experimental Ash Plume
Storms of Asphodelos
Double tank tethers and TEA style single hit Protean Wave + Fire Pillar proximity baits

Darkblaze Twister
Tethers the three fire pillars at the edge of the arena. One tether will be dark. The party should start near it, at the edge of the boss’ hitbox.

Searing Breeze puddles will spawn under the party. The party should stagger step clockwise around the boss. You’ll end up just about where you started.
Experimental Ashplume will telegraph a stack or spread.
There will be a Knockback from the dark tethered pillar. You will want to have a light party split, with each light party getting knocked towards a separate fire pillar. You want to get knocked back as close as possible to the pillar without touching it, as there is a ring AOE around the pillar and only a small area is safe.

As soon as the knockback happens, resolve the stack or spread. This is very similar to the knockback mechanic in E12S Second phase.

Scorched Exaltation

Death’s Toll
Everyone in the party receives a random number of debuff stacks (1, 2, or 4)
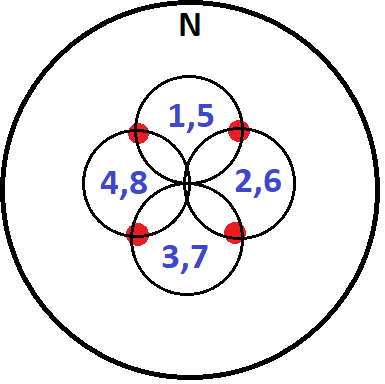
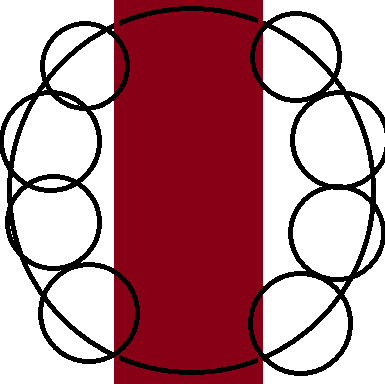
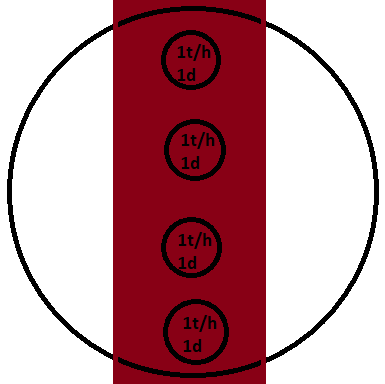
Fledgling Flight
These eyeballs need to be placed facing inward. Essentially, to resolve the mechanic you want to be hit by the same number of eyeball cleaves as the number of stacks that you have.
The below image shows the safe spots for each debuff number.

Life’s Agonies
Kills anyone who still has a stack. Also does a lot of damage.

Experimental Gloryplume
Wait until the stack or spread telegraphs before moving

Trail of Condemnation
Another spread or buddy stack dash.

Devouring Brand
Experimental Fireplume + Searing Breeze + Left / Right Cinderwing
Same as earlier in the fight – bait by the edge and dodge towards the middle

Scorched Exaltation x2
Final Exaltation – Enrage

Contributors
  • Illiette Vaieroyant – Sargatanas
  • Vjkta
    KanameS
  • And more!

Site Feedback

Noticed something broken? Noticed something great? Have comments you want to share? Fill out the form below to share your thoughts on the site.