Search
Close this search box.

Hippokampos Encounter Guide (P2S)

Draft guide for the first floor Pandæmonium Savage
SaltedXIV et al.
Table of Contents

Introduction

Welcome to the SaltedXIV encounter guide for Asphodelos: The Second Circle (Savage)! This fight builds on some of the mechanics introduced in the normal version, while adding some extra difficulty and complexity. This raid requires an average item level of 575 to enter.

Timeline

Phase 1
0:14Murky Depths
0:24Doubled Impact
0:37Sewage Deluge
0:47Arena floods
1:00Spoken/Winged Cataract
1:20Coherence
1:36Murky Depths
1:43Ominous Bubbling
1:54Shockwave
2:12Predatory Avarice
2:30Spoken/Winged Cataract
[Opposite of 1:00]
Phase 2 - Channeling Flow
2:38Arena drains
2:50Channeling Flow cast
3:06Channeling Flow resolution
3:20Doubled Impact
3:30Murky Depths
3:47Sewage Deluge
Phase 3 - Kampeos Harma
3:58Arena floods
4:05Shockwave
4:18Kampeos Harma
4:40Doubled Impact
4:49Murky Depths
5:03Channeling Overflow cast
5:10Tainted Flood
5:25Tainted Flood
5:27Channeling Overflow first resolution
5:32Channeling Overflow second resolution
5:44Spoken/Winged Cataract
Phase 4 - Dissociation
5:49 Arena drains
6:03 Predatory Avarice
6:09 Dissociation
6:27 Spoken/Winged Cataract
6:41 Dissociation
6:54 Sewage Eruption
6:59 Tainted Flood
7:16 Coherence
7:31 Doubled Impact
7:40 Murky Depths
7:57 Sewage Deluge
Phase 5 - Overflow + Coherence
8:09Arena floods
8:14Channeling Overflow cast
8:30Channeling Overflow first resolution
8:32Coherence
8:45Channeling Overflow second resolution
8:57Dissociation
9:10Sewage Eruption
9:22Ominous Bubbling
9:32Shockwave
9:46Doubled Impact
9:59Murky Depths
 Murky Depths
 Murky Depths (ENRAGE)

Mechanics

  • Murky Depths: Raidwide
  • Doubled Impact: Shared Tankbuster (can be invulned)
  • Sewage Deluge: Hard hitting Raidwide – arena transforms to water filled state
  • Spoken Cataract / Winged Cataract: Cleaves parts of the arena based on where the parts of the boss are facing and which cast it is. See diagram below.
  • Coherence: Tank tether (goes far from party) this can be swapped between tanks. And a tank line of sight stack goes on the party. The player closes to the boss will take a tank buster and the rest of the party will share moderate damage. Have a tank soak in front of everyone.
  • Ominous Bubbles: There will be two stack markers, one per healer. Light party splits to resolve.
  • Shockwave: Knockback from the corner the boss is jumping to. HIGHLY recommend Surecast / Arms Length
  • Predatory Avarice: Applies debuffs to the party 2 of: who must must spread away from the party and each other. One  is applied to a healer. Everyone without a debuff should stand with the marked healer for shared damage.
  • Channeling Flow: Applies to  everyone in the party, and apply a giant arrow to each player. When the timer expires, they will be knocked in the direction of their arrow.
  • Kampeos Harma: “Limit Cut”. See detailed explanation below.
  • Channeling Overflow: Applies   to everyone in the party, half the party with ~10s and the other half with ~20s duration. See detailed explanation below.
  • Tainted Flood: Spread markers.
  • Dissociation: The boss separates his head from his body. The head will appear outside the arena and do a charge across half the arena.

Fight Strategy

Phase 1

Murky Depths
Doubled Impact
Tankbuster on MT, OT stacks with MT and both use mitigation, or one tank invulns and takes both hits.
Sewage Deluge (arena fills with water)

At this point, one of the four squares on the arena will start to glow, and will be unsafe for the remainder of the phase until the water clears again. This will be referred to as the “poopy square”.

Spoken Cataract / Winged Cataract
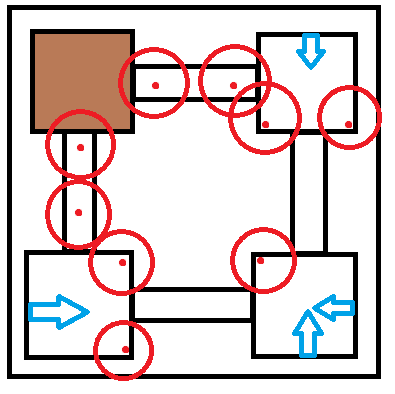
The bosses head and body will each have an arrow indicating which direction they are facing. The orange arrow always does a wide line cleave through the arena both ahead and behind in the direction of the arrow. The red arrow indicates a half room cleave. If the cast is “Spoken” this cleave is in the direction of the arrow. If the cast is “Cataract” it is in the direction AWAY from the arrow.

Coherence
This ability consists of a tank tether and a Wild Charge on the party. One tank needs to take the tether and move to just beside the poopy square. They will take a hit from their tether. The rest of the party needs to stack up, with the other tank in front. The closest person to the boss receives the most damage from the stack, so make sure it’s a tank.

Murky Depths
Ominous Bubbling + Shockwave
Have one light party stay where the Coherence was resolved, and have the other light party move to the corner that the boss is jumping to.

Predatory Avarice + Spoken Cataract / Winged Cataract
This will resolve after the next Cataract. Have the party dodge the cataract, then have the spread members move out while the rest of the party stays stacked.
Water drains from the arena

Phase 2 - Channeling Flow

Channeling Flow
This is just a practice run of the arrows mechanic.

If players are along the longer axis of the arena, melee can keep uptime if they are paired with a ranged who moves back all the way to the wall. See Diagram to the left.

IMPORTANT: You want to be opposite another player so that you crash into them and cancel out your charges. Otherwise you will move too far and be killed.

Doubled Impact
Murky Depths
Sewage Deluge

Phase 3 - Kampeos Harma

Arena floods again

Shockwave + Kampeos Harma
“Limit Cut”

This is one of the more complex mechanics of the fight. The boss will turn and telegraph which corner it is jumping to with a Shockwave. After he jumps, players will receive either a purple or a blue number. This number will range from one to four. Blue numbers will also have a tether to the boss.

The boss will separate. One half of the boss will charge between the blue tethers in order, while the other half will charge between the purple tethers, in order.

We put the 1-4 waymarks down on the arena in the places that correspond to where the purple number people need to go. So if you get a purple number, just move to the waymark that matches your number. Watch out for the poopy square, as it will kill you. Go the long way if you need to. Purple numbers are also indicated with triangles, which may be easier to read.

Blue numbers (indicated by squares) are relative to the boss. Since blue charges are also proximity based, 1 and 3 should move to the corner opposite the boss, while 2 and 4 should move on top of the boss. The boss will charge each blue-tethered player in sequence, from 1 to 4.

1 and 2 should be a couple steps closer to the middle of the arena, to guarantee they take the hit. Once they have been hit, they should swap position with the 3 or 4 person on their platform. Both players on each platform should stand toward the farthest corners to avoid accidental splash damage being too close to the center of the arena from the purple players. There is no damage splash from blue-marked players to each other, so they can stand close to the edge together as long as the correct one is in front.

(Note: Second pot window as soon as this mechanic resolves)

Doubled Impact
Murky Depths
Channeling Overflow + Tainted Flood x2
Half the party will receive a ~10s Arrow, while the other half will receive a ~20s arrow. Since this is happening while the water is filling the arena, there is also a poopy square which limits movement.

While the short debuff folks are resolving their charges, the long debuff players will receive tainted flood spread markers. These need to be dropped in such a way as to avoid hitting the Arrow players. Afterwards, roles will swap. The long debuff players will resolve their Arrows, while the shorts have Tainted Floods.

The diagram below shows how the arrow dashes must be resolved relative to the poopy square.

There are more safe spots for the Tainted Floods. The ideal ones are the four (two and two) on either side of the poopy square, but some of the grate corners are also safe. Just be sure you are VERY in the corner, and that you will not clip an arrow with your puddle.

Phase 4 - Dissociation

Water drains from the arena

Spoken / Winged Cataract
Predatory Avarice + Dissociation + Spoken / Winged Cataract
The party should stay stacked on the grate, while the spread players move towards the wall in the safe area. You can use little triangles on the floor to help find safe spots.

Dissociation + Sewage Eruption + Stagger Step Puddles + Tainted Flood + Coherence

The boss starts with a Dissociation – take note of where the head appears on the arena. The rest of the party should stack on the south grate opposite of the head divebomb. There will be three periodic aoe puddles dropping, and the party should stutter step across to the other safe grate (north).  As the third puddles appear, the charge will go off, so it is safe to dodge it back into the middle of the arena.

Everyone will get a Tainted Flood spread marker – spread out. As soon as the Tainted Floods go off, the party needs to stack for Coherence, while the OT grabs the Tank tether and brings it away from the party. Make sure MT is at the front of the party.

Doubled Impact
Murky Depths
Sewage Deluge

Phase 5 - Overflow + Coherence

Channeling Overflow + Coherence
Again half the party will have short arrow debuff and half the party will have long. Long debuff tank takes the tether. Other long debuff players should dodge the charges in the middle grate, as shown by the green squares in the diagram below. Long debuff players will not have splash damage on them so these locations are safe—there is no need to run far as they will need to quickly return for Coherence.

Immediately after the first arrows resolve, the party (except OT) should collapse on the nearest grate and resolve Coherence (MT in front). Long Debuff arrows will then resolve.

Dissociation + Sewage Eruption + Stutter Stack Puddles
Ominous Bubbling + Shockwave

Contributors
  • Illiette Vaieroyant – Sargatanas
  • Vjkta
    KanameS
  • And more!

Site Feedback

Noticed something broken? Noticed something great? Have comments you want to share? Fill out the form below to share your thoughts on the site.