Search
Close this search box.

Erichthonios Encounter Guide (P1S)

Draft guide for the first floor Pandæmonium Savage
SaltedXIV et al.
Table of Contents

Introduction

Welcome to the SaltedXIV encounter guide for Asphodelos: The First Circle (Savage)! A lot of the core mechanics of the fight are similar to those of the Normal mode but have been made more complex for the Savage Difficulty. This raid requires an average item level of 570. 

Before you begin, it is recommended that you set up waymakers that look like this: https://raidplan.io/plan/ywI63qsAPMQzTqEf  and have the group pre-assign clock positions for the Intemperance mechanic. This is typically done with Tanks North and South, Healers East and West, and DPS at the intercardinal points. The specifics of this mechanic will be explained in detail later. That should be all you need to get started so let’s dive into the timeline and some of the key mechanics.

Timeline

Phase 1
0:13Heavy Hand
0:22Aetherial Shackles
0:31Warder’s Wrath
0:58Gaoler’s Flail (in/out or side/side)
1:11Pitiless Flail (Grace or Purgation)
1:30Gaoler’s Flail (opposite of the previous one)
1:44Warder’s Wrath
Phase 2
1:58Intemperance – Floor change
2:14Intemperant Torment (1st cube)
2:21Warder’s Wrath
2:262nd cube
2:31Warder’s Wrath
2:373rd cube
Phase 3
2:47Pitiless Flail
3:08Shining Cells – Floor chang
3:28Aetherflail (combination of left/right and in/out)
3:43Pitiless Flail
4:03Aetherflail (opposite of the previous one)
4:14 Shackles of Time
4:25Heavy Hand
4:38Slam Shut
Phase 4
4:54Fourfold Shackles
5:28Warder’s Wrath
5:41Intemperance – Floor change
5:57Intemperant Torment (1st cube)
6:01Gaoler’s Flail cast
6:092nd cube
6:13Gaoler’s Flail resolves
6:203rd cube
6:29Warder’s Wrath
Phase 5
6:47Shining Cells
6:58Aetherial Shackles
7:09Aetherchain
7:17Aetherchain
7:27Warder’s Wrath
7:35 Shackles of Time cast
7:46Pitiless Flail
7:54Shackles of Time resolve
8:04Warder’s Wrath
8:25Aetherflail
8:43Aetherflail (opposite to previous one)
9:01Aetherflail (in/out or side/side)
 Warder’s Wrath
 Warder’s Wrath
 Warder’s Wrath
 […]
10:00Lethe ( ENRAGE )

Mechanic Overivew

Standard tank buster.

Party-wide AoE damage.

Gaoler’s flail will do different AOEs depending on the weapon at the end of Erichthonios’ chain. Pay attention to the visual cues to know which AoE to avoid.

  • If there is a chakram at the end of the chain – This will be a donut AoE where the inside of the boss’ hitbox is safe. Move inside the hitbox to avoid damage.
  • If there is a mace at the end of the chain – This will be an inner AoE where outside of the boss’ hitbox is safe. Max melee should be safe for this ability.
  • If there is a sickle at the end of the chain – The boss will perform a 270 degree cleave leaving either the east or west wedge of the arena safe. Move to the opposite side from where his weapon drops. The boss will recast this ability on either side the first time it is used, so move through accordingly.

This is a Tank Buster with a knockback that should be shared with the party, or invulned. It will also apply a magic Vulnerability debuff to the tank requiring a tank swap if not invulned.

This is a Tank Buster and knockback mechanic. It will also place a flare on one tank that needs to be taken away from the party. The tank buster will also apply a magic Vulnerability debuff to the tank, requiring either a tank swap or an invuln.

Red or white orbs will appear around the boss indicating which color of floor tiles will explode.

Two debuff icons appear on two random players: one red, the other purple.

  • Shackles of Sharing, the red debuff, will tether the player to the 3 furthest allies.
  • Shackles of Loneliness, the purple debuff, will tether the player to the 3 closest allies.

After a short delay, a circle AoE will go off on all players based on their debuff or tether, with the red ones being significantly larger than the purple ones.

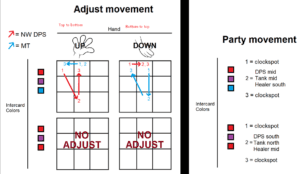
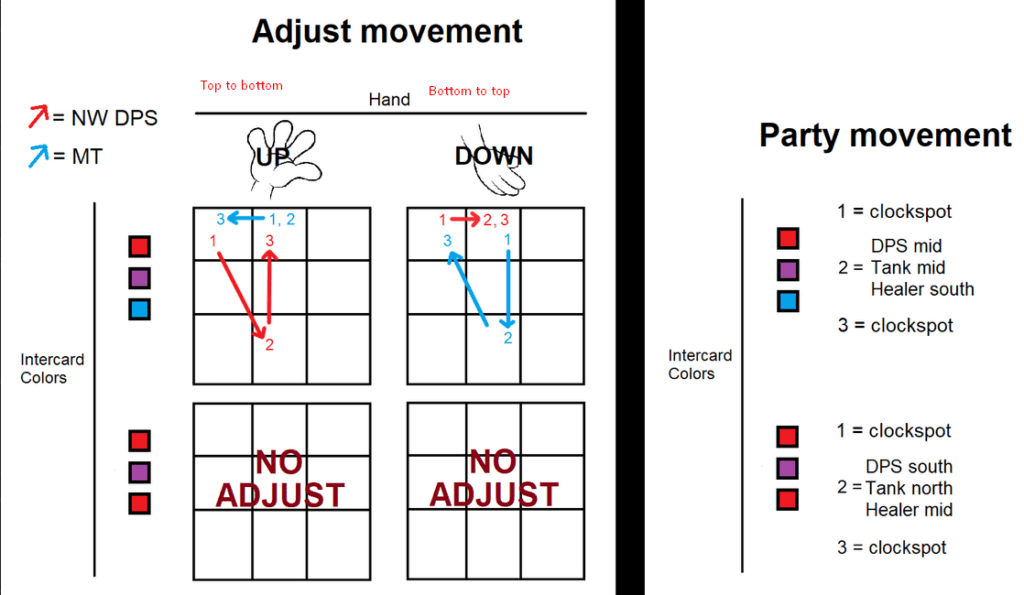
Intemperance begins with moderate raidwide damage and a phase change. After the phase change, the room will be divided into 9 squares with crystals stacked in various colors (red, blue, and purple). These cubes will explode in order, either top to bottom, or bottom to top, depending on whether the boss has a glowing hand up, or down. If the glowing hand is down, the gems will explode bottom to top. If the glowing hand is up, the gems will explode top to bottom. Players will be afflicted with Hot and Cold debuffs (red and blue respectively). When a gem explodes on your square, you will receive that color debuff. The goal for this mechanic is to resolve your debuff using explosions from gems of the opposite color.  

During this phase there are a few instant-kill zones. The first is the purple lines that appear to divide the room into squares, these become instant kill zones when the cubes are exploding. The second is any squares that will explode with a purple gem color.

During the first and third gem explosions, only one person can be on each square, which will require some careful debuff management. 

There are a limited number of crystal variations possible, allowing the mechanic to be solved in a predictive manner. The strategy section below goes into more detail.

Shining Cells begins with a heavy raidwide AoE and then a phase change, complete with a new floor layout. The arena will be divided into triangular slices of red or bluish-white. The AoE damage is heavy and will require mitigation. During this phase you will need to contend with the Shackles of Time mechanic described below.

Shackles of Time will debuff a random player. The color that the player is standing on will explode and the opposing color will be safe for the rest of the party. Failing the color mechanic will break the shackles.

Fourfold Shackles is an advanced version of Aetherial Shackles. All players will get the random shackles debuffs, four will get the red Shackles of Sharing and four will get the purple Shackles of Loneliness. As a reminder, Shackles of Loneliness (red) is a significantly larger AoE than Shackles of Companionship (purple). After the debuff resolves, the players will get Inescapable Loneliness (red) or Companionship (purple). This signifies whose AoE will go off next. Each set of debuffs will resolve five seconds after the previous set, and there are four sets of debuffs (hence, Fourfold Shackles).

Fight Strategy

To begin the fight, players should be assigned to “clock spots,” having one player on each of the cardinals and intercardinals. Main tank north, off tank south, healers east and west, and DPS on the intercardinals. The party should also designate one color, red or blue, to be the party’s color for shackles of time.

Phase 1 – Tankbusters and AoEs

Aetherial Shackles

Boss re-centers and players assume marked positions, taking note of their color buddy (for example, A and 1 are both red, therefore they are color buddies). Aetherial Shackles resolves and assigns 1 random player a red debuff and 1 random player a purple debuff. If red debuff is on an inner marker, swap with color buddy. If purple debuff is on outer marker, swap with color buddy.

Pitiless Flail of Purgation

Tanks should invuln or tank swap during this cast and move flare markers away from the party. Keep in mind, Knockback immunities will not work for this ability.

Pitiless Flail of Grace

Tanks should invuln or tank swap during this cast and bring the stack marker close to the party. Knockback immunities will not work for this ability.

Gaoler’s Flail

Unlike in normal, gaoler’s flail can do different things based on the weapon at the end of Erichthonios’ chain. Pay attention to the visual cues to know which AoE to avoid. 

  • Chakram – Move inside the hitbox to avoid damage.
  • Mace – Move somewhat outside the hitbox – melee should be at max range for this ability as the AoE extends outside the hitbox marker.
  • Sickle – Find the safe spot directly behind the sickle. The boss will recast this ability on either side, so pay attention to which one drops first, then move to the opposite side immediately once the first aoe has resolved. Using the markers on the boss’ hitbox is recommended as the boss model and animation can be deceptive. 

During Phase 1 – Chakram and Mace will happen paired, as will two Sickle casts for either side. Both will be used in this phase in a random order, so keep your eyes peeled.  

During Phase 3 (Shining Cells) – Mace or Chakram will be paired with Sickle this time. The same safe zones as above will apply, but instead of inside/outside and side/side, you will be asked to move from an inside or outside safe zone into a triangular safe zone behind the sickle, so be aware of your surroundings and the visual cues. 

During Phase 5 – Erichthonios will reuse all previously seen combinations.

Phase 2 – Intemperance

Intemperance

Players can resolve this mechanic in one of two ways, depending on which direction the crystals are exploding in. Each player needs to resolve the requirements of their respective tile from the clock spots assigned earlier. The middle stays unassigned. 

The main tank and one of the northern DPS should be prepared to swap according to the elements spawned to make sure all players can resolve the mechanic correctly. 

Players need to alternate hits of temperature debuffs to survive this phase, while avoiding tiles with purple crystals while the purple is exploding. Pay attention to which elements are on your assigned tile as you cannot take two elements twice in a row, but need to remain on your tile for this first and third hit. This is resolved by grabbing the alternate element debuff during the second crystal explosion, if needed.

See the diagram below for movement.

The following applies to all players except the main tank (North) and one northern DPS (NE or NW). All other players should take the first explosion in their clock position’s tile. To grab the correct elemental debuffs, during the second all party members who need an different element should move to the correct tile that will explode (either north or south).

  • Players whose tile have two of the same element (fire | purple | fire, or ice | purple | ice) should take the second explosion on either the north or south tile that has the element opposite to the one on their assigned tile.
  • Players who’s tile contains both elements (ice | purple | fire, or fire | purple | ice) should move to the middle tile during the second round of explosions to avoid taking damage from the purple squares, and avoid swapping their elemental debuff.

The adjusting DPS and main tank will take the first explosion on their assigned tile. If the north tile is exploding with the same element as the first, the adjusting DPS needs to move in the northern most tile, and the tank needs to move to the south. Both players should be soaking alternate elemental debuffs. For the third explosiong, these two players should return to the N and NW tile respective to which element they need to correctly resolve it, hence the potential need to adjust.

Phase 3 – Shining Cells

Shining Cells

The floor of the arena will change into a circle, with alternating red and blueish-white wedges. The boss will do a series of three visual tells indicating what mechanics to preform. First either fire or light orbs will appear around him. Then he’ll throw his sickle on one side of the arena. Finally he’ll throw one more weapon, either the chakram or mace.

Players will need to resolve each of these correctly by standing on the correct color, the correct side, and dodging in or out.

For example if the boss is glowing with fire, throws his sickle east, and spins his mace, then players need to stand on a blue wedge (to resolve fire) on the west side of the arena (avoiding the 270 degrees covering the east, so only the western quadrant), do not stand NW or SW), and dodge outwards (dodging his mace).

Shackles of Time

To complete Shackles of time, the marked player needs to stand in an opposite color wedge than the rest of the party. The party will also need to dodge a gaoler’s fail cleave at the same time.

Phase 4 – Fourfold Shackles & Intemperance Part 2

Fourfold Shackles

While Fourfold Shackles is casting, all players approach the center of the arena. Upon resolution, all players will receive a debuff. Each player must take note of the color of their debuff (red or purple) and its duration (3, 8, 13, 18). Reds position on intercardinal markers according to debuff duration (3 goes to A marker; 8 to B; 13 to C; 18 to D). Purples position on cardinal markers according to debuff duration (3 goes to 1 marker; 8 to 2; 13 to 3; 18 to 4). Remain in these positions until mechanic fully resolves after fourth explosion.

Intemperance

This mechanic is the same as earlier, with an additional gaolers flail thrown, requiring players to dodge accordingly. This hit occurs after the second explosion so, stand in your first tile, move to your second needed tile, dodge the flail, then resolve your third tile explosion.

Phase 5

The shining cells and colored floor mechanic repeats from earlier. After this is a series of tankbusters and raidwide AoEs before the final enrage cast around the 10 minute mark.

Boss will use the following attacks in total during Shining Cells 2. The order seems to vary:

  • Aetherial Shackles
  • Aetherchain
  • Warder’s Wrath
  • Shackles of Time into
  • Pitiless Flail
  • Aetherflail

For Aetherial Shackles, the boss re-centers and players assume marked positions. Resolve the debuffs as before, but also taking note of the floor colors the boss will be detonating. There is adequate room around each marker to adjust slightly to either side to resolve the color mechanic.

For Shackles of Time, all except main tank group behind boss. Shackled player on edge of one color, group nearby on the other. Resolve Pitiless Flail normally while keeping color positioning.

Contributors
  • Vjkta – the uber rough janky notes 
  • Ettrian – Intemperance Guide
  • Averis – Lots of clarification and good info
  • Nona – Intemperance info and shackles of time strat
  • KanameS – Clarification and Waymarks
  • Rapture – Aetherial Shackles & Intemperance Infographics
  • Levi – added details, rewrote and added phases, will be doing a lot more editing and rewriting later…
  • And more!

Site Feedback

Noticed something broken? Noticed something great? Have comments you want to share? Fill out the form below to share your thoughts on the site.